ANNE PRO 2D User Manual
1. USB Mode
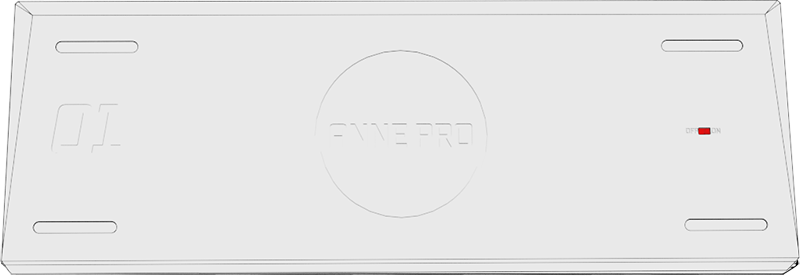
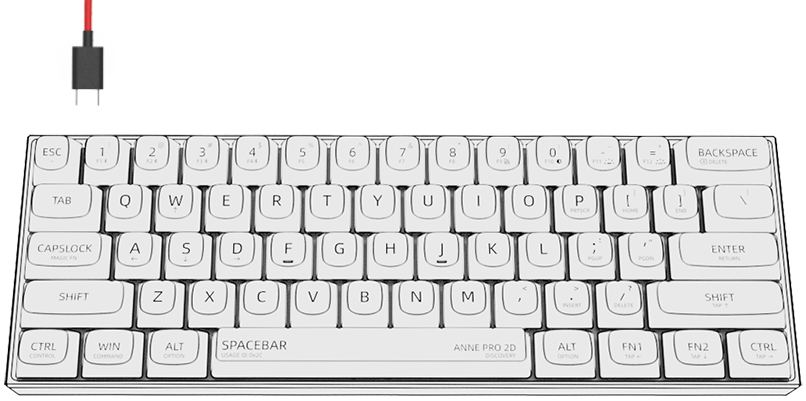
Connect keyboard to computer through USB Type-C cable, and make sure that the wireless switch(on the back of keyboard) has been turned OFF.
2. Bluetooth Mode
2.1 Bluetooth Pairing
1) Turn on wireless switch (back of keyboard)
2) Turn on Bluetooth Broadcast
Turn on the Bluetooth pairing mode:
Hold down FN2 + 1(2, 3, 4) key for 5 seconds, and make sure that the wireless switch (on the back of keyboard) has been turned ON.
Blink red light means keyboard is ready for pairing.
The keyboard will in pairing mode for 1 minutes.
After successful pairing or pairing timeout, the light exits flashing mode
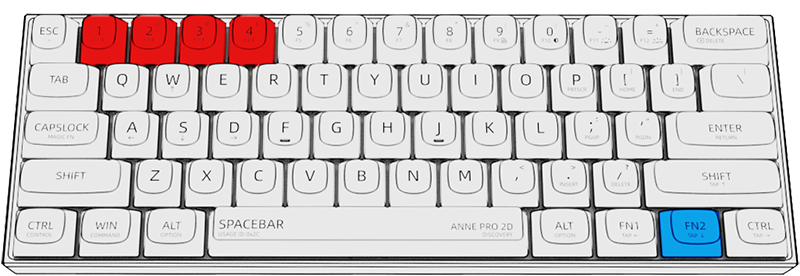
FN2 + 2 (5 seconds) = Turn on Bluetooth broadcast at position 2
FN2 + 3 (5 seconds) = Turn on Bluetooth broadcast at position 3
FN2 + 4 (5 seconds) = Turn on Bluetooth broadcast at position 4
3) Add Bluetooth Device
Windows
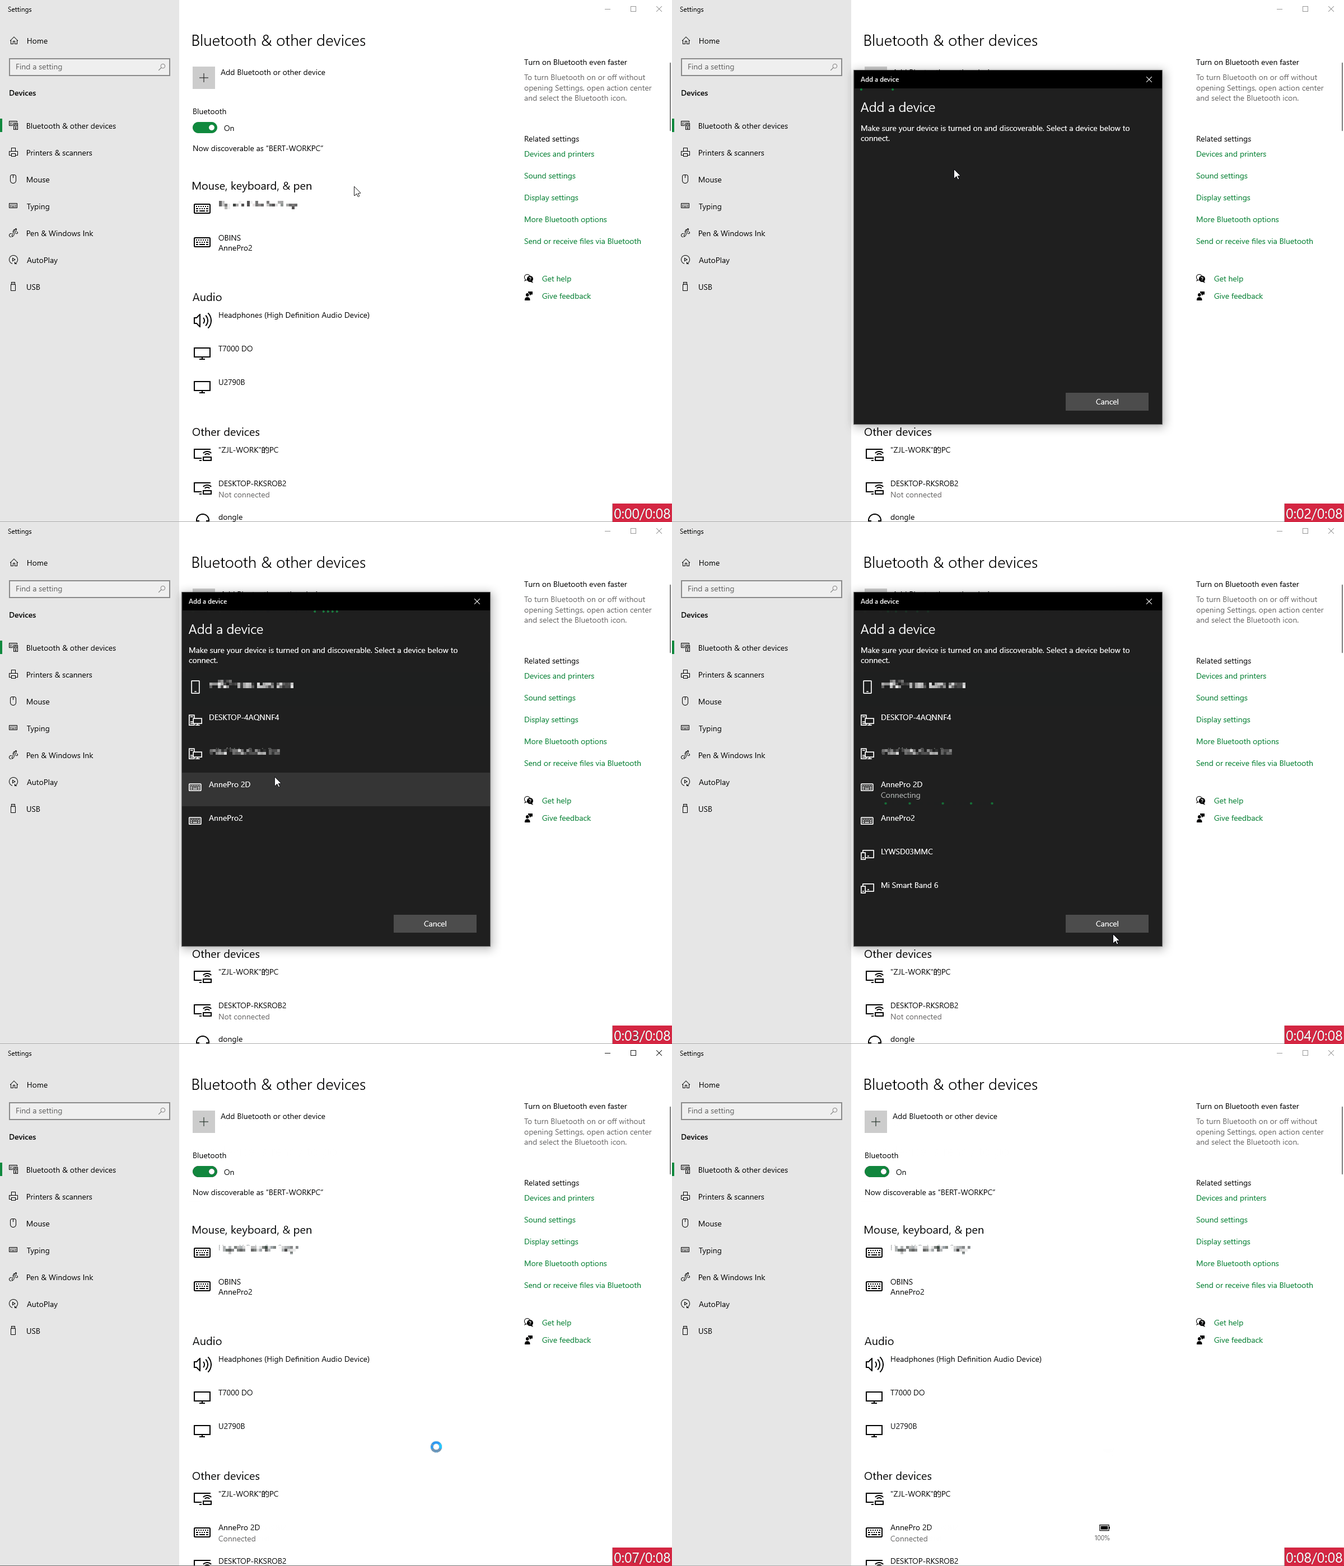
Enter the windows "Settings", click the "Bluetooth & other devices" menu, click "Add Bluetooth or other device" to start the bluetooth pairing. The operation demonstration is as follows:
Troubleshooting:
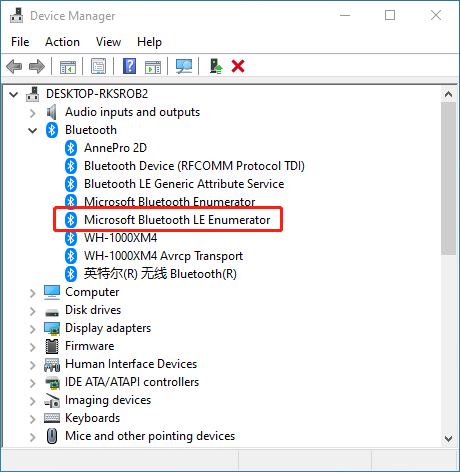
Check that your computer supports Bluetooth LE
- Right-click the windows icon(shortcuts:
Win+X), SelectDevice Managerfrom the menu. - Check whether
MicroSoft Bluetooth Enumeratorexists in the list. If not, then the current host does not have a Bluetooth hardware or the Bluetooth hardware does not support BLE. Then you need to purchase a Bluetooth adapter.
2.2 Host Switch
Press (short) FN2 + 1(2, 3, 4) at the same time to switch between multiple bound hosts.
Blink green light means keyboard is switching over the hosts.
On successful, the light exits the flashing mode.
FN2 + 2 = Switch to host 2
FN2 + 3 = Switch to host 3
FN2 + 4 = Switch to host 4
3. Layout
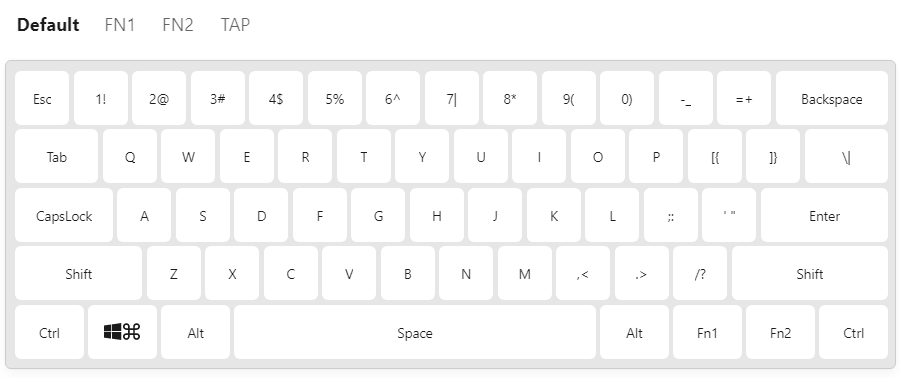
The keyboard has four layers, including Default Layer, FN1 Layer, FN2 Layer and TAP Layer.
Note: Below is the factory settings, you can customize the key value for all keys.
3.1 Default Layer
3.2 FN1 Layer
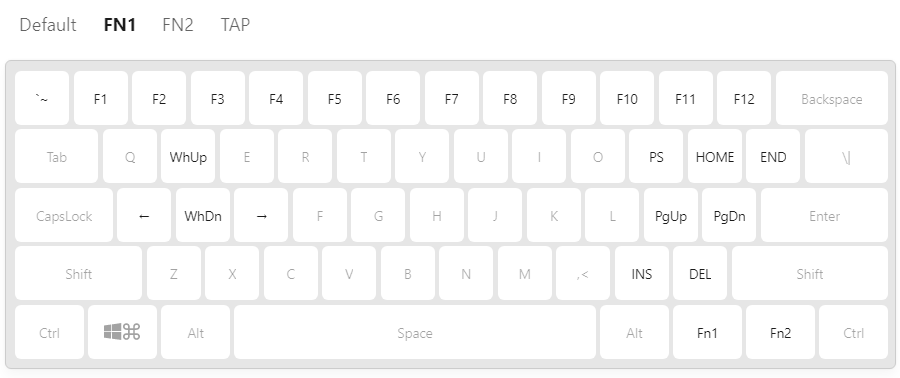
| Symbol | Trigger Mode | Function |
|---|---|---|
| `~ | FN1 + Esc Shift + FN1 + Esc | ` ~ |
| F1 | FN1 + 1 | F1 |
| F2 | FN1 + 2 | F2 |
| F3 | FN1 + 3 | F3 |
| F4 | FN1 + 4 | F4 |
| F5 | FN1 + 5 | F5 |
| F6 | FN1 + 6 | F6 |
| F7 | FN1 + 7 | F7 |
| F8 | FN1 + 8 | F8 |
| F9 | FN1 + 9 | F9 |
| F10 | FN1 + 0 | F10 |
| F11 | FN1 + - | F11 |
| F12 | FN1 + = | F12 |
| ↑ | FN1 + w, FN1 + i | Up |
| ↓ | FN1 + s, FN1 + k | Down |
| ← | FN1 + a, FN1 + j | Left |
| → | FN1 + d, FN1 + l | Right |
| PRTSCR | FN1 + p | PrintScreen |
| HOME | FN1 + [{ | Home |
| END | FN1 + ]} | End |
| PGUP | FN1 + ;: | PageUp |
| PGDN | FN1 + '" | PageDown |
| INSERT | FN1 + .> | Insert |
| DEL | FN1 + /? | Delete |
3.3 FN2 Layer
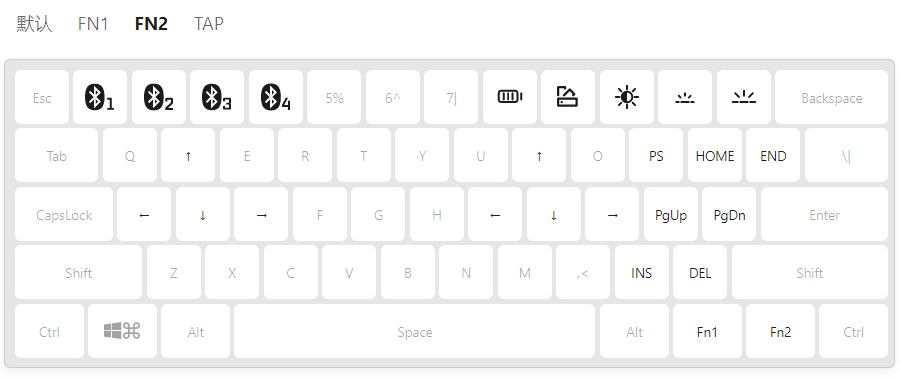
| Symbol | Trigger Mode | Function |
|---|---|---|
 | Click FN2 + 1 Press and Hold FN2 + 1 | Switch to Bluetooth Host 1 Bluetooth broadcast at position 1 |
 | Click FN2 + 2 Press and Hold FN2 + 2 | Switch to Bluetooth Host 2 Bluetooth broadcast at position 2 |
 | Click FN2 + 3 Press and Hold FN2 + 3 | Switch to Bluetooth Host 3 Bluetooth broadcast at position 3 |
 | Click FN2 + 4 Press and Hold FN2 + 4 | Switch to Bluetooth Host 4 Bluetooth broadcast at position 4 |
 | FN2 + 8 | Battery |
 | FN2 + 9 | Switch Light |
 | FN2 + 0 | Enable/Disable Backlight |
 | FN2 + - | Decrease Backlight |
 | FN2 + + | Increase Backlight |
| ↑ | FN2 + w, FN2 + i | Up |
| ↓ | FN2 + s, FN2 + k | Down |
| ← | FN2 + a, FN2 + j | Left |
| → | FN2 + d, FN2 + l | Right |
| PRTSCR | FN2 + p | PrintScreen |
| HOME | FN2 + [{ | Home |
| END | FN2 + ]} | End |
| PGUP | FN2 + ;: | PageUp |
| PGDN | FN2 + '" | PageDown |
| INSERT | FN2 + .> | Insert |
| DEL | FN2 + /? | Delete |
3.4 TAP Layer
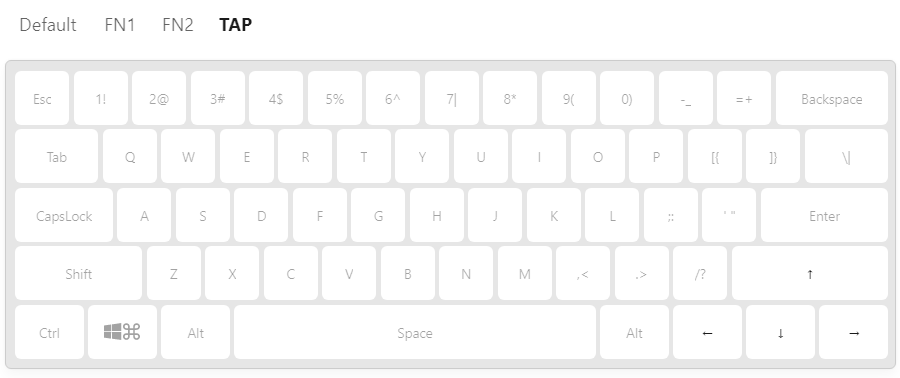
| Symbol | Trigger Mode | Function |
|---|---|---|
| ↑ | ClickRight Shift | Up |
| ↓ | ClickFn2 | Down |
| ← | ClickFn1 | Left |
| → | ClickLeft Ctrl | Right |
3.5 Default Key List
The following table shows the function of each symobal, you can customize the key value for all keys.
| Symbol | FN1 | FN2 | TAP | Function |
|---|---|---|---|---|
 | √ | Bluetooth | ||
| √ | Switch Light | ||
| √ | Enable/Disable Backlight | ||
| √ | Decrease Backlight | ||
| √ | Increase Backlight | ||
| `~ | √ | `~ | ||
| F1 - F12 | √ | F1 - F12 | ||
| ↑ | √ | √ | √ | Up |
| ↓ | √ | √ | √ | Down |
| ← | √ | √ | √ | Left |
| → | √ | √ | √ | Right |
| PRTSCR | √ | √ | PrintScreen | |
| HOME | √ | √ | Home | |
| END | √ | √ | End | |
| PGUP | √ | √ | PageUp | |
| PGDN | √ | √ | PageDown | |
| INSERT | √ | √ | Insert | |
| DEL | √ | √ | Delete |
4. Function Introduction
4.1 Light Control
ANNE PRO 2D presets a variety of lighting effects, and provide four shortcuts for controlling.
| Symbol | Trigger Mode | Function |
|---|---|---|
| FN2 + 9 | Switch bewteen lights |
| FN2 + 0 | Enable/Disable Backlight |
| FN2 + - | Decrease Backlight |
| FN2 + + | Increase Backlight |
4.2 Power level display
| Symbol | Trigger Mode | Function |
|---|---|---|
| FN2 + 8 | Battery level |
4.3 Modify Layout And Macros
You can assign keycode of Media Keys, Mouse Keys and Macros in the software. For details, please refer to the Layout section of Hexcore Link.
5. Firmware Upgrade
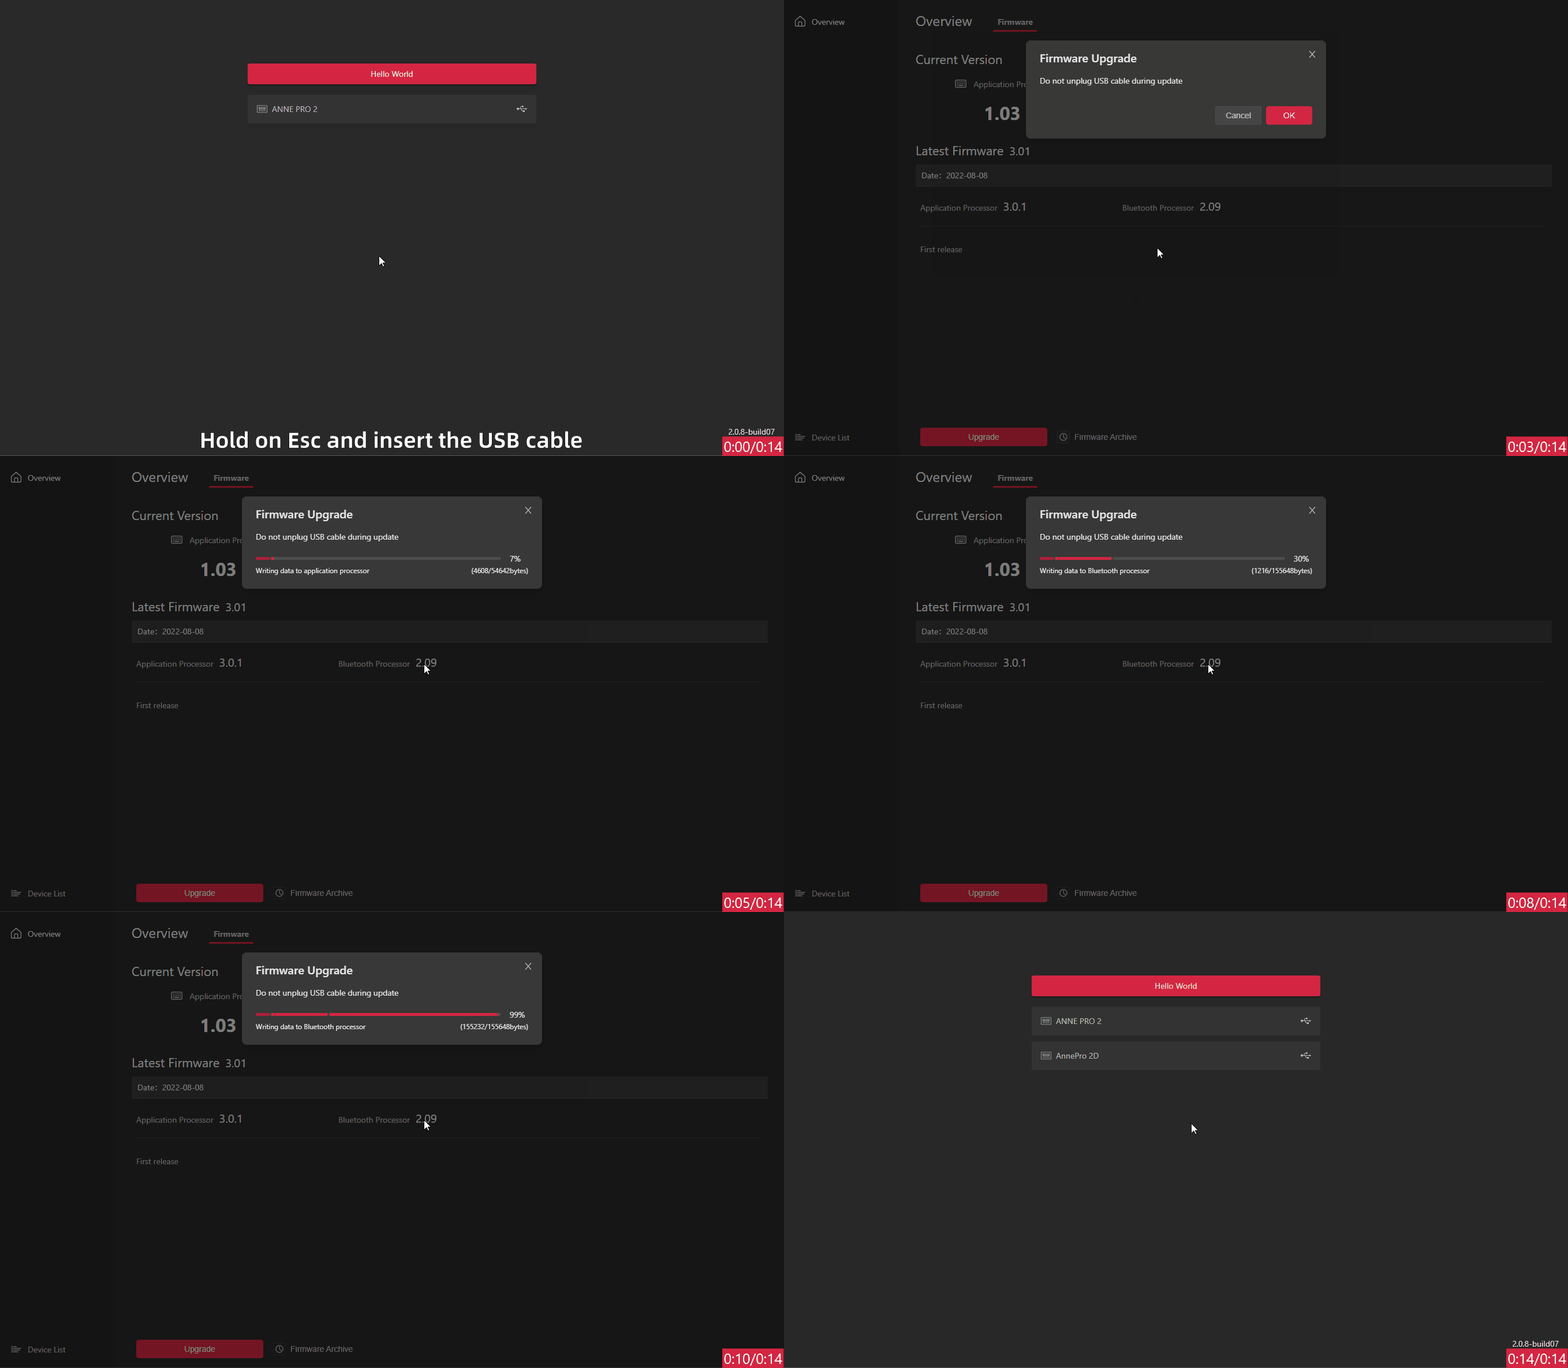
Automatic Upgrade: In the firmware interface, click the
Upgradebutton.Forced Upgrade (IAP Mode):
Forced Upgrade is required in the following cases:
1) Automatic upgrade failed;
2) The keyboard cannot be typed, and the device is not identified in the Hexcore Link.- Step 1: Turn off the switch on the back of the keyboard
- Step 2: Unplug the USB cable
- Step 3: Hold on the Esc key and insert the USB cable. Release Esc while the device(name contain the characters "IAP") showup
- Step 4: Select the device to upgrade firmware.
6. Software Support
For more functions, please install Hexcore Link.